OCR
The OCR Transform reads image files and converts text in the image to a text-format message. This Transform is not part of the MxVision system.

The OCR Transform performs text recognition on a selected Region of Interest (ROI) of an image read from the InputImage port. All major languages are supported.
Prerequisites
InputImage: This inport accepts images from a source such as the USB Webcam (Generic) Transform. It does not use the proprietary NI Vision format. TextResult: This outport transmits a message containing the recognized text. |
Configure these properties before using the Transform: ABBYY Runtime Binary Directory: Select the folder that contains the Abbyy Runtime DLL. Typically this is: C:\AbbyRuntime\Bin64 Configure Text Recognition: Click Image Base Directory: Select the output folder for the Signal generated from this Transform. Select the folder that includes the FULL_IMAGE folder. See Default Directory Structure. |
The Project directory includes folders and files used by MxVDev. To ensure that relative paths are stored correctly, everything associated with the project should be located in the project directory. (In the example below, "MxVDev Test" is the project directory.) The camera Transforms and the NI Vision system use the RecoImages sub-directory by default. You can use the same folder name for consistency, but it is not required for OCR. Create a folder for every Signal that originates from an OCR Transform. There is one output Signal for each OCR Transform. This folder is the Base Directory. Other images and sub-directories associated with this signal are placed here. Each signal needs at least one full-scale image (un-cropped image), and it should be placed in the FULL_IMAGE directory.  Example of default directory structure In the example above, COOLANT, Foglamp, Timer, and TirePressure are output Signals. The PATTERN and SAMPLES folders are not used by OCR. |
To configure text recognition, click
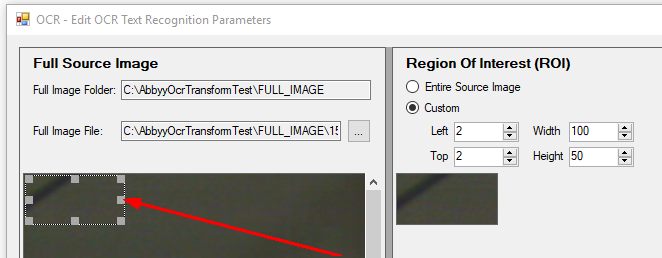
The Full Image Folder is preset from the Image Base Directory property on the Transform. Click To perform OCR on the entire image, select the Entire Source Image button. To select a part of the image as the ROI, click the Custom button to display the ROI box. Use the mouse to drag and reshape the ROI box. You may need to use the scroll bars to find the ROI. You can also use the spin boxes (Left, Top, Width, Height).  ROI Box Select the language(s) of the text. If no language is selected, English is used. Click the Recognize ROI Image button to test text recognition on the selected ROI. |
The example below shows the OCR Transform used with other Transforms. In this example, when the File Triggered Camera detects a change to an image file, it transmits the image to the OCR Transform. The OCR Transform reads the image and transmits the text in a message to the Message Logger, which saves the message to a text file.
|


