Transform File Locations

Contents
When MxTransIt starts, it checks the following locations for Transforms:
•The bin subfolder in the MxSuite installation folder.
•The bin\3rdPartyTransforms folder if it exists
•The location of the mxform file when you start MxTransIt from MxVDev. (If you use File‑>Open, the Transforms are loaded when the mxform file is opened.) The recommended location for the mxform file is the Transforms folder in the project directory.
•Any folders in the MxTransIt Additional File Locations list
If there are any C# code (.cs) files, they are compiled. If there are DLL files, they are loaded. All the Transforms found are listed in the MxTransIt Toolbox.
When you create a Custom Transform your DLLs and related files must be stored in one the following locations. In order of preference: 1.The Transforms folder in the project directory for Transforms useful for a specific project. They will be available to the project even if it is moved. 2.A folder listed in the MxTransIt Additional File Locations. Use this for Transforms that may be used by multiple projects and users. (To share your Transform with multiple users, see Using a Shared Network Folder.) If necessary, add the folder to the list.) 3.The bin\3rdPartyTransforms folder for Transforms provided by other groups or companies. 4.The bin subfolder in the MxSuite installation folder is not recommended. (Overwriting files in this folder may corrupt your installation.) |
To display the list of Transform file locations, select Tools->Options from the MxTransIt main menu . Use the buttons to add or remove folders from the list.
Normally, if you add a folder here, you should also add it in MxVDev. See User Options–Additional File Locations. To access Transforms on a network, you can include shared network folders in this list. Use the procedure below to configure the required settings. |

You can use a shared network folder to access Custom Transforms from multiple PCs. On every machine that uses this shared folder, set the Code Access Security setting to trust MicroMax Transforms: •This can be done via the Microsoft .NET Framework 2.0 Configuration (Mscorcfg.msc). This tool is part of the .NET 2.0 Framework SDK and can be downloaded at: http://www.microsoft.com/download/en/details.aspx?displaylang=en&id=19988 •More information on Mscorcfg.msc can be found at: http://msdn.microsoft.com/en-us/library/2bc0cxhc%28v=vs.80%29.aspx Use this procedure: 1.In Windows 7, go to Control Panel->System And Security->Administrative Tools-> Microsoft .NET Framework 2.0 Configuration 2.Expand My Computer->Runtime Security Policy->Machine->Code Groups->All Code
3.Right-click on All_Code and select New. 4.On the dialog box that pops up, enter a name for the code group, then click Next>.
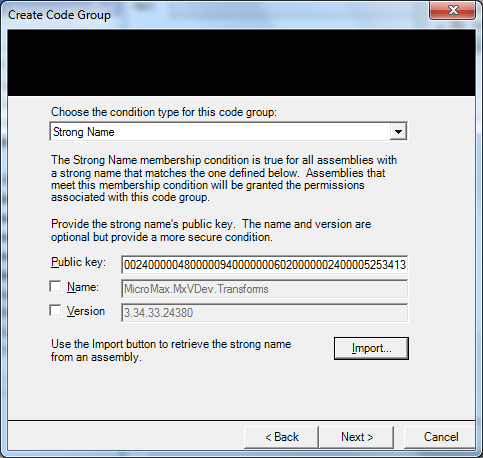
5.On the next page, select Strong Name from the drop down list.
6.Click the Import button, and navigate to the bin subfolder of the MxSuite installation folder. 7.Select MicroMax.MxVDev.Transforms.dll. 8.Click Next.
9.Leave the setting on the next page as Full Trust, and click Next.
10.Click Finish. 11.Exit the Configuration tool. The machine is now ready to use shared Transforms. Include the shared network folder in the Additional File Locations List. |


User Options–Additional File Locations