TestCase Properties

Contents
A TestCase has several properties that you can change to control how the test executes.
There are several ways to access TestCase properties:
•Click the ![]() icon in the TestCase toolbar.
icon in the TestCase toolbar.
•Select TestCase‑>Properties from the main menu.
•Right-click on the TestCase form and choose the Properties item in the pop-up menu:

The basic properties include:
•Name: This is the internal descriptive name of the TestCase, which is displayed in the Scenario. You can use this property to change the internal name. When a TestCase is created, the file name is the internal name plus the .mxc suffix. For ease of use, we recommend the file name and internal name stay the same unless there is a good reason for them to differ. See Renaming a TestCase.
•Time Unit: The basic time-units (ns, us, ms, or s) used to specify all times and durations for this TestCase.
The following tabs provide access to the remaining properties for the TestCase:
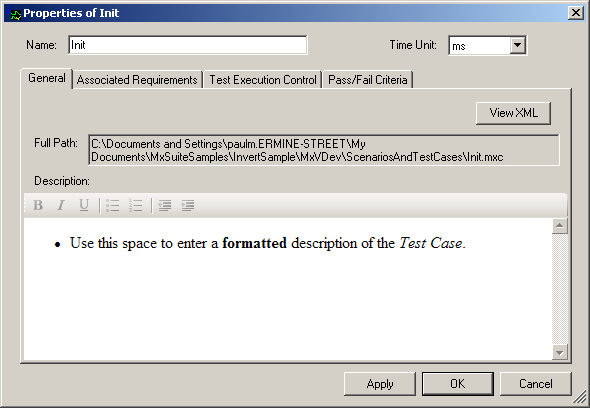
The General tab in the TestCase Properties dialog box appears as follows:
•Full Path: This is the name and location of the TestCase file. To change the file name, see Renaming a TestCase. •View XML: Offers the ability to view the properties of the TestCase in XML format. •Description: Use this space to enter a description of the TestCase. Use the buttons at the top of the description to apply HTML formatting. This description is displayed in reports. If you paste cells from a spreadsheet, the data is stored as an HTML table. You can edit each cell internally, but you cannot change the boundaries of the cells. To edit the data as plain text, paste it into Notepad, then copy and paste it into the Description box. |
The Associated Requirements tab enables you to associate the TestCase with specific requirements. Double-click in the row of the Traceability Links table to link to the specified web page or file. For more information on using this feature, see Requirements Traceability. The tab in the TestCase Properties dialog box appears as follows:
To use this feature, first define the Requirements Sources for the Project using the Req Sources tab on the Project Settings dialog. SourceSelect a source from the drop-down list to associate it with the TestCase. See Req Sources. If the source is an alias, move the mouse over the row to display the original in a tool tip bubble:  Tool Tip for Web Help Alias IdUse the Id field to identify a more specific requirement, such as a paragraph, a bookmark, a path, or a file name.If the Source is a URL or a partial URL, the Id field is concatenated to the Source field. Move the mouse over the row to see the concatenated URL in a tool tip bubble. DescriptionYou can use this plain-text field to describe the requirement or how the requirement applies to the TestCase. This description does not appear in reports. Examples
|

The Test Execution Control tab in the TestCase Properties dialog box appears as follows:
Note: All time values in MxVDev can be specified down to a precision of one nanosecond. •Test Resolution: The Test Resolution is used for the following: oSignal Generators use the Test Resolution as the interval between transitions oThe Accept Results command uses the Test Resolution when converting the actual transitions on a continuous Signal to expected transitions. oThe Test Resolution is used when drawing Tolerance Bands on continuous Signals. oThe Test Resolution determines the default zoom setting for the TestCase. •Test Start Delay: The is a delay after the preconditions are satisfied before the test case starts to run. •Randomizing Range: You may not want the TestCase to start at exactly the same time each time it runs. Use this field to allow the Test Start Delay to changed randomly, within this range. •Initial Test Step: Indicates that execution starts at the beginning of the TestCase. This cannot be changed. •Test Duration: The Test Duration specifies how long the TestCase is allowed to execute. You can also change this value with the TestCase Ruler. |

The Pass/Fail Criteria–Absolute Time Tolerances tab in the TestCase Properties dialog box appears as follows:
•Lower Tolerance: The amount of time before the Expected Time where the output value may still be considered a Pass. If the actual transition time is greater than or equal to the Expected Time - Lower Tolerance, the transition is within tolerance. •Upper Tolerance: If the actual transition time is less than (but not equal to) the Expected Time + Upper Tolerance, the transition is within tolerance. Notes: •Pass/Fail results checking can be enabled or disabled for each DataBlock. •For more information, see Tolerances. |

The Pass/Fail Criteria tab in the TestCase Properties dialog box appears as follows:
This allows the Pass/Fail Criteria to be determined based on differences between triggers for DataBlocks. See Relative Time Criteria. Notes: •Pass/Fail results checking can be enabled or disabled for each DataBlock. •Even when Relative pass/fail criteria is used with triggers, the absolute time criteria still applies. |

To create or edit a Reactive TestCase, select the Reactive Code tab. See Reactive TestCases for instructions.
|

Note: To save the TestCase windows' size and position, select File->Save All from the main menu.