Project Settings

Contents
Some of the information that you provided when you created a new project can be changed by navigating to Project Settings. From the Main Menu, select Project‑>Project Settings. The following tabs are displayed:
Project information is stored in the MxVDev project and displayed on reports. There are three fields you can edit: •Company Name •Project Name •Project Description
|

This dialog provides a place to select your Test Harness and quickly edit the properties of each SUT the Harness.
•Harness Transform: The .mxform file that contains all Transform information in the Virtual Wiring Harness. •Click •Keep the Signal Dictionary synchronized to the Harness: This option applies when running automated testing. When selected, any port changed or added in MxTransIt is automatically reimported when the Harness is connected. Any Signal properties already in the Signal Dictionary are overwritten. When connecting with the GUI (non-automated), the Connections dialog controls the synchronization. •Remove stale connections: When this box is checked, stale connections (missing connections, for example, connections to ports that are no longer exported) are removed. This is done behind-the-scenes; it is not displayed in the Connections dialog. The connections are removed, but the Signals remain in the Signal Dictionary. You can use this dialog to connect your MxVDev project to a different Harness or SUT. For example, you could have a Harness named HW.mxform that is connected to a HIL SUT, such as an instrument cluster. You could also have another Harness named SW.mxform that uses an MxVMC or a Simulink model to simulate the behavior of the instrument cluster. If the stimulus and response Signals are the same in both Harnesses, you can use the same TestCases to test both. Auto Export SignalsYou can use this tab to set the VMC Auto Export Signals property. This enables you to connect to the VMC without opening MxTransIt. See Using VMCs–Exporting Ports.
|


Use this tab to control when Pass/Fail Analysis is performed. 1.Select Project->Project Settings from the main menu. 2.Select the Pass/Fail Analysis tab:
Abort TestCase and Scenario when a failure occurs (Stop-on-fail) - Select this box to stop execution of the TestCase and Scenario when a failure is detected in any TestCase. If a Regression Test is running, execution continues with the next Scenario. On-the-Fly analysis must be selected with this option. For more options, see Creating a Trigger. Suspend test run when failure occurs - This option is available when On-the-fly analysis is selected only. Select this box to suspend TestCase execution when a failure is detected. While execution is suspended, you can make changes to TestCases (possibly correcting the failure). Click the run button ( Indicate failures when Actual Signal Values are outside the defined minimum and maximum range for the Signal - By default, a failure is indicated during Pass/Fail analysis whenever a Signal's value is outside its tolerance, when it exceeds its maximum, or when it falls below its minimum. Minimum and maximum values are defined in the Signal Dictionary, or in a DBC or LDF for CAN/LIN signals. To disable minimum/maximum range checking, uncheck this box. This is useful when working with CAN or LIN signals where the range specified in the DBC or LDF is incorrect. Note: Pass/Fail results checking, including range checking, can be enabled or disabled for each DataBlock. Related Topics: |

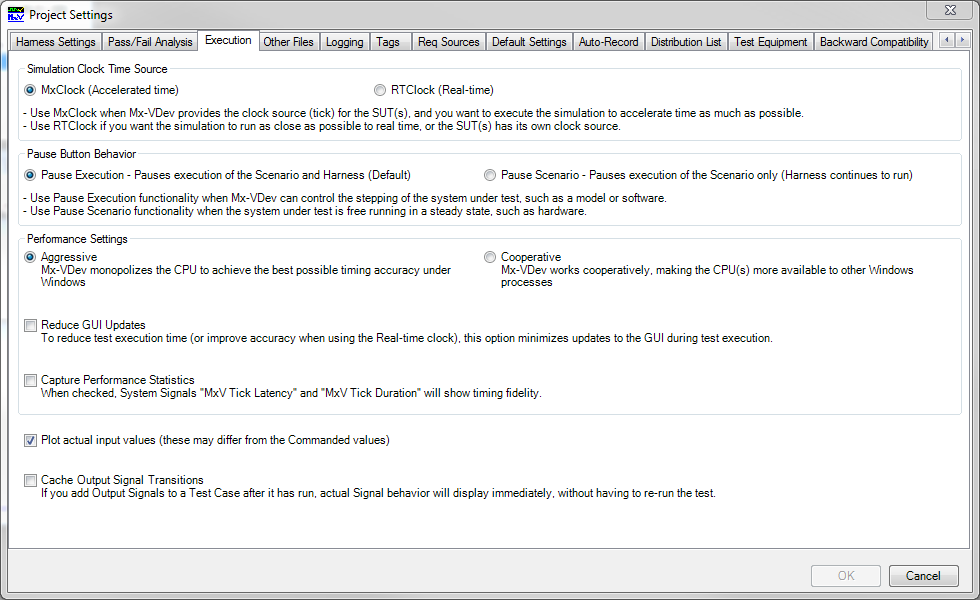
Click the Execution tab on the Project Settings form to modify the options that affect test execution.
These options control MxVDev during the execution of a Scenario. •Simulation Clock Time Source - selects the timing method under which the test is executed: oMxClock - Executes using Accelerated time (tests execute as fast as possible). This option is normally used for SIL testing. oRTClock - Executes using a clock that is as close as possible to real-time. Selecting this option is useful for Interactive Tests and HIL testing. •Pause Button Behavior: This option controls behavior when the test is paused with the Pause button, a breakpoint, or the Suspend-on-failure option. oPause Execution - Select this option to pause execution of both the Scenario and the Harness. Use this option when the SUT is controlled by MxVDev, such as SIL or MIL. oPause Scenario - Select this option to pause execution of the Scenario only. Use this option when the SUT can operate independently, such as hardware. •Reduce GUI Updates (Optimize for speed) - Selecting this minimizes updates to the GUI during test execution. Also, no result comparison is done until test execution is complete. Selecting this option may be necessary when performance is critical. •Plot actual input values - When this box is checked, you can use the Show Actual Values option on Stimulus Signals to plot both the Specified pattern (how the test commands the signal to change) and the Actual pattern (how it actually changes). Although an MxVDev TestCase sets input signals and reads output signals, it is entirely possible for your application code or another TestCase to change the value of input signals. |
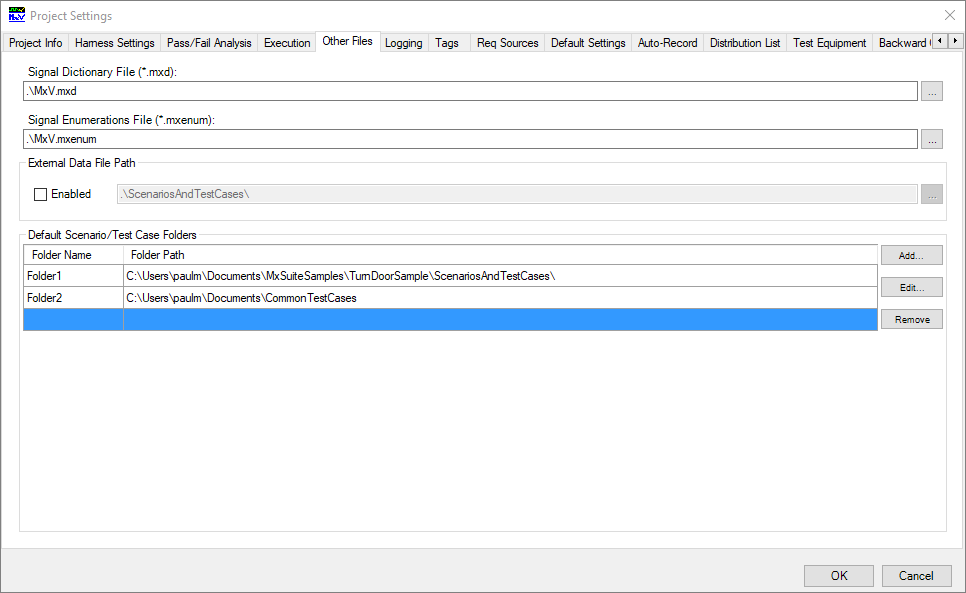
Signal Dictionary File (.mxd)This is the file in which the Signal definitions are stored. For more information, see MxSuite Files and Folders and Using the Signal Dictionary. Signal Enumerations File (.mxenum)This is the file in which Enum sets are stored. For more information, see MxSuite Files and Folders and Working with Enums. External Data FileCheck Enabled to enter a path for External Data files. See External Data. Default Scenario/TestCase Folders Use this box to specify folders where Scenarios and TestCases are stored. You can share Scenarios and TestCases between projects and users by adding one or more shared folders to this list. You may use these folders to create a library of standard TestCases that can be used when creating new projects; see Reusing TestCases. The folders included in this list can also be selected for Regression Testing. Use the Folder Name (first) column to assign a internal name to the folder. These names are used by MxVDev in the Project Explorer and the Regression Test Wizard. To change the Folder Name, click on it. |
Click the Logging tab on the Project Settings form to modify the options that affect Scenario execution logging.
Logging OptionsMxVDev always logs basic execution and error information to the project log file. This log file has the same name and path as the Project file, but with a .log extension (instead of .mxp). It is not possible to reconfigure this file name. These options control what information is logged to this file as a Scenario executes. The data is stored in text format, in a file that has the same name and location as the scenario file, but with a .log extension. This Scenario log is used primarily when running in unattended or batch mode. Logs created during Scenario execution •Scenario Stimuli (Commands) Logs - Check one or more of the following to produce a command log file while executing the Scenario. A command log file captures the Stimulus/Command transitions as the Scenario is executed and does not contain actual results. These files can be run in another test environment. For example, the MxSuite MxVI (LabVIEW Connector) can read and execute these files on an NI LabVIEW test platform. oXml file (*.mxcmd) - typical XML format. oStreaming format (*.mxcmdsteam.csv) (CSV file) - each row is a combination of: time, value, Signal name oMatrix format (*.mxcmdmatrix.csv) (CSV file) - time is output vertically, Signal names horizontally, and the values at their intersection These files are stored in the same folder as the Scenario, by default the ScenariosAndTestCases subfolder in the project folder. oXML file (*.mxlog) - Select this box to enable Scenario logging. The file contains the actual response data captured as the Scenario executes. If desired, this file can be converted to CSV. ▪Include Stimulus Commands in the log file - All actual stimulus transitions (input Signals) will be added to the Scenario log file. ▪Include Virtual Network Trace in the log file - Select this box to capture virtual bus trace data in the log file. See Virtual Bus Monitor. oActual Results Template (*.mxact.csv) - Check this box to create a file listing the output Signals for which the response data is required. oCreate Scenario Report - When this box is selected, a file named Report.<Scenario Name>.xml is created in the same folder as the Scenario, for example: Report.DoorTurnScenario.xml ▪Landscape - Select this box to create the report in Landscape format. Portrait is the default. ▪Convert to PDF - When this box is selected, a file named Report.<Scenario Name>.pdf is created, for example: Report.DoorTurnScenario.pdf. To avoid performance degradation, this option does not apply when the Scenario is run as part of a Regression Test. To create a PDF Regression Report, see Regression Report. ▪Select PDF Report Folder - By default, the PDF report is created in the same folder as the Scenario. Click •TestCase Logs - Capture separate log files for each TestCase as the Scenario executes. oScenario TestCase CSV Export (*.mxc.csv) - Check this box to export the TestCases in the Scenario. ▪Include All Signals - Add all Signals in the Signal Dictionary to the exported TestCase file, even if they are not in the TestCase. ▪Dependent TestCases - Use final Signal values from the earlier tests as starting values for the subsequent tests in the exporting TestCases. •Include Transitions for Task/Event Signals - Select this option when you want to have the scheduled tasks and events logged in your Scenario log file. •Limit XML log file size - Check this box to enable the automatic partitioning of Scenario Stimuli (.mxcmd) and Scenario Results (.mxlog) log files. A new file is created when the size exceeds 100,000 records. After the first file, a number is appended to the file name. Converting Scenario Results Logs to CSVScenario Results Logs (.mxlog files) are created in XML. You can use the following procedure to convert the file to CSV format: 1.Select File->Import->TestCase Data->MxLog file from the main menu. 2.Use the browser to select the .mxlog file to be converted. 3.Select TestCase->Export to CSV from the main menu. Related Topics: |

Active Tags in TagGroups control how MxSuite tests run. In regressions, they can cause a select subset of Scenarios to run, they can change the effective value of constants, and reactive code can be implemented to respond to them. Tags can be activated and cleared using this dialog and other ways. See Tags and Tag Groups. Use this procedure to add tags to a project. The project must be open in MxVDev. 1.Select Project->Project Settings from the main menu. 2.Click on the Tags tab.
3.By default, tags are stored in a file named <project name>.mxtags in the project folder. Click 4.Select an existing group or click Add Group to create a new tag group. 5.Use the Description boxes to enter descriptions of your groups and tags. Descriptions are not required, but using them improves the clarity and reusability of your tests. 6.Click Add Tag to create a new tag. 7.Repeat steps 4 through 6 to create as many tags as desired. 8.Use the Delete button to remove unwanted tags. 9.Click OK when finished. The check boxes indicate which tags are active. To activate a tag, click the checkbox next to it. See Tags and Tag Groups. Use the Save Tags and Load Tags buttons to export or import an .mxtags file for sharing with other projects or users. When you load tags, new tags are merged into the existing tags. In the case of conflicts, the newly loaded tags take precedence.
Related Topics: |

You can use the Requirements Sources tab to specify documents and URLs to be associated with the project. These sources are used for TestCase and Scenario Properties and in reports. See Requirements Traceability for more information. 1.Select Project->Project Settings from the main menu. 2.Select the Req Sources tab:
The name of the Requirements Source may be any of the following:
It is often more convenient to use an alias for long URLs, such as DOORS URLs. If you specify an alias, the alias name is used throughout MxVDev. Once you have entered all your sources, use the drop-down menu box to choose a Default Requirement Source. Related Topics:TestCase Properties–Associated Requirements |

Use this tab to specify the default settings for TestCases and version control. 1.Select Project->Project Settings from the main menu. 2.Select the Default Settings tab:
TestCase DefaultsEnter the default time values to be used when you create a new TestCase. Default Absolute Time TolerancesEnter the default time values to be used when you create a new TestCase. Version ControlMxVDev inserts this string in all XML files, which include TestCases, Scenarios, logs, and reports. The string can be used with Version Control systems that support keyword substitution. You can use substitution strings to mark files with information such as version, date modified, and user names. Signal Auto ScaleUse this check box to set the default option for displaying Signals in reports. To override this option, see Signal Properties. Reactive DefaultsThis dialog lists the DLL references that are included by default in Reactive Code. Use the Add and Remove buttons to edit the list. References can be changed in a specific piece of code using the User Code Panel, for example in a Reactive TestCase. Related Topics: |

You can use the Auto-Record function to automatically create a TestCase from a Scenario run. 1.Select Project->Project Settings from the main menu. 2.Select the Auto-Record tab. 3.Click Enable Auto-Record.
The CSV file should look something this:
Note that Signal names are case sensitive. If used, the Template Scenario must contain at least one job (such as Init) before recording. Related Topic: |


Use the Project Settings to specify a distribution list for the Regression Report. 1.Select Project->Project Settings from the main menu. 2.Select the Distribution List tab:
3.Use to Add and Edit buttons to add a name to the distribution list or change it. Related Topic: |

Send reset to the harness prior to a Scenario startingThis option is on by default. Support out of order MxV Module Reset signalsWhen this option is selected, MxVDev may assert an MxV Module Reset immediately after an MxV Input Reset, effectively discarding the input reset. This behavior was allowed prior to release 3.36.47.32484, but is not recommended. See System Reset. For new projects, this option is off by default. Use 0 for null data when exporting transition data to CSV and Export only one transition per Module Reset to CSV fileThese options control how TestCase data is exported to CSV files. They are off by default. When selected, format of the CSV files is the same as in older releases.
|

